Tuesday, November 17, 2015

Contour Drawing

Art Level: High School (ideally junior-senior)
Materials: sketchpad, pencils

This lesson was done for my older students that had a bit more experience in the art making process. While they were more advanced, that does not mean that this lesson cannot be taught to beginners. Results will vary!

First, I had students simply draw their hands on their papers. However, there was one catch. They had to keep their eyes on their hands at ALL times. They were not to take their eyes off their hands and look at their papers. The students didn't know it yet, but we were making blind contour drawings.

Some students are better at this than others. We are so used to looking at what we are drawing that it comes as a shock for some when they are forced to create things essentially "blind". Many individuals were getting frustrated and didn't want to make their drawings look "bad". I find that most of my older students are VERY concerned about how their work looks and they get easily angered if they don't believe their work looks good to them. They want to be neat and structured, and this activity is the complete OPPOSITE >:)


Sorry about my phone here :)


After the activity I handed out worksheets that explained the left/right brain theory. This was an intriguing discussion for students because it made them understand how they think and why they get frustrated doing something. The LEFT brain involves more common sense and realistic thoughts. The RIGHT brain is more imaginative and less structured. We talked about if we were more left or right brained and how it affected the process of blind contour drawing.


After, we talked about how we can use both our left and right brains successfully when we work. Then, I had the students complete contour drawings where they COULD look at their paper.

Blind Contour Drawing
Contour Drawing
  Both of these were done by the same student. Contour drawings are all about making students SEE what is actually there rather than what they THINK they see. They must rid their negative left brained thoughts and focus on seeing. This was a fun lesson that students enjoyed.

Turtle Color Wheels

Art Level: Elementary (ideally Kindergarten)
Materials required: paper plates, finger paint, scissors, paper

Me with the little ones learning about color!

Color! It is such an exciting thing for students to experiment with. I find kids just always get more excited when there is color involved. Their faces light up and you can tell they are thinking about all of the crayons they are going to rummage through and break. Color may be messy, but it sure is FUN!

This lesson was done at the Ringwood Public Library for my internship, where I ran 4 different programs for children of all ages. For this class, we created color wheels but added a little something extra :) Students created their own TURTLE color wheels. They learned about the primary colors, secondary colors and then cut out paper to glue their turtle parts onto their wheels.


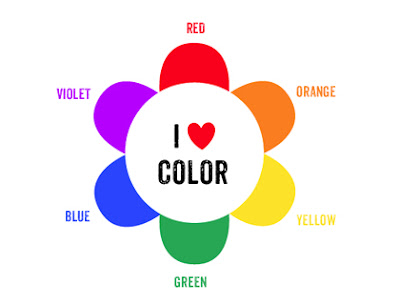
I created my own color wheel to present to the class and walked around the room asking them to identify what colors #1, #2 and #3 were

Students were then given their own color wheel paper plates and asked to fill in the first three colors with finger paint.
Then, students mixed the primary colors on a separate paper plate to get the secondary colors. Students were amazed that they were changing colors with their very own hands! Then, the turtle color wheels began.


I have to say, without the help from the parents in the class this would've been difficult. I had a room full of 30 young children who were mostly 5-6 years old. Plus, the kids brought their younger siblings so I was handling a lot of preschoolers, as well. I didn't mind, and the parents and I worked together successfully! However, I knew for next class to clarify the age on the sign up sheet!


Look Mom! I have my own art cart!

This was such a fun and exciting lesson for the students and myself. It was definitely messy, so I suggest doing this lesson and having a bit of assistance. Color is always a good time, though :)


Clown Faces

One of the reasons why I love elementary school is because students are at the beginning stages of learning about art. Teachers have the opportunity to truly get students excited about the artistic process. We are essentially giving them the tools they need to flourish. Lessons must be basic but engaging at the same time.

I thought this lesson was a good way to introduce students to shape and how to use them. I wanted my students to recognize how we see shapes in every day life. For this reason, I had them create clown faces.

Students first identified shapes and practiced drawing them on a worksheet. Because I had a variation of ages in my elementary group, I decided to make it more basic so the younger students (1st and 2nd grade) could participate in the activities successfully. 

Students traced the shapes, named them and colored them in.
I had an additional worksheet for those who finished early. I knew the older kids would do the first task easily. Because of this, I gave out a worksheet that was still simple but a little bit harder.

Students weren't just given shapes to draw- they had to take it a step further and challenge themselves to figuring out which colors would represent each shape.
Then, students were given construction paper and were asked to create their own clown faces based upon the shapes we just learned about. Students were to think about how to use shapes to make their clowns EXPRESSIVE- because they were to NAME their clowns!

I never expected to meet a 6 year old that knows Metallica LOL

 I decided to do something I've never done with this age group. We presented our characters to the class. Students were asked to get up in front of the room, introduce their clowns' names, and tell us a bit about them (hobbies, interests, etc). I have to say, this lesson would not have been as successful if it wasn't for this presentation. Students had the opportunity to expand their imaginations and get creative. They loved the story element of this lesson.

Happy faces!
When it comes to elementary school, it is really important to encourage their imaginative thinking. Incorporating other subjects into a lesson is a great advantage. It can be as simple as having students read a story and then draw what they think the story would look like. Students are more engaged and on task. I loved seeing my students get creative in this lesson. It showed me more about them, as well. Success all around!

Wednesday, November 11, 2015

Crazy Hair Day


Art level: Elementary
Materials required: white construction paper, pencil, crayons, colored pencils
Concepts taught: Line and exploring types of line design

Title of lesson: "Crazy Hair Day"
Objective:
To be able to describe and create different kinds of lines.
To produce a 2 dimensional work of art.
To identify strengths in their own work.

This lesson was our introduction to our line unit. I wanted to introduce the kids to line with a basic activity that is engaging and allows them to express some creativity.

First, we went over different kinds of line.

Students traced over these lines with pencil. Simple, yet effective for the age group!
After tracing, we looked around the room and pointed out all the different lines that we just learned about. They loved realizing that the lines they just traced could be seen in everyday objects.

Then, I had the students draw a basic shape to make their heads.
The assignment was for students to use the different line designs to make crazy hair. They first drew with pencils then colored. They loved it!


Future artist right here?? :)


Thoughts on lesson: This was just simply FUN. The students had a great time and loved getting imaginative making their crazy hair.

Mini Hand Zentangles


Art level: Middle School
Materials required: white construction paper, pencil, crayons, colored pencils
Concepts taught: Line and exploring types of line design

Title of lesson: "Mini Hand Zentangles"
Objective:
To be able to identify different line variations.
To produce a zentangle using several line types.


Here's a fun lesson that I did with my 10-13 year olds when we learned about line! Most students don't realize how many different things they could do with line and how they could use line quality to enhance their projects.

First, I went over what a line is and gave them a hand out showing them all of the different kinds of lines that exist.


They had to finish this worksheet, which I found easier than having them just copy lines. They had to continue the visual which worked in their favor!
 Then, I had students trace their hands onto a piece of white construction paper. They were then instructed to divide their hands into sections using line.


 After learning about all of the different types of line, they then were allowed to fill in those sections with line designs. However, they weren't allowed to have 2 sections of the same design next to one another. Then they colored!

This student took it to the next level and did line design outside the hand! Zentangle artist in the making :)

I love all of the shapes and line design in this one!


This lesson was great. The students learned a lot about line and it really stuck with them. I kid you not, every lesson after that they would bring up how they could use line and wanted to refer back to their line worksheets. Having visuals always helps!

Sunday, November 8, 2015

Starry Night (with a twist!)


Art level: Middle School
Materials required:
  • 2 worksheets given prior to project for practice
  • Black construction paper
  • Oil Pastels (they were encouraged to use cool colors)
Concepts taught: Line design, balance and mood

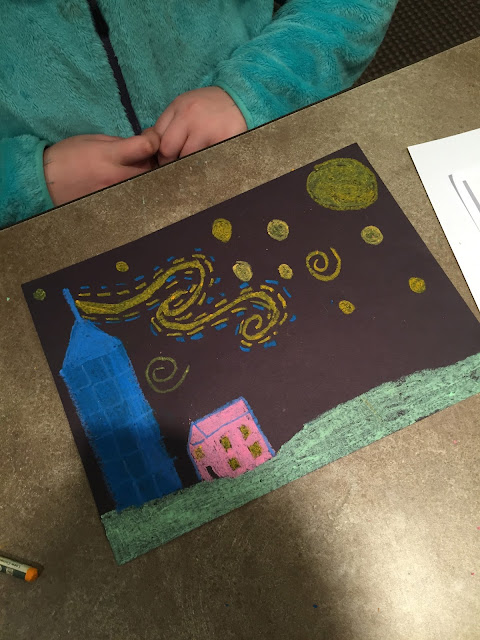
Ahh, Starry Night. This is one of my absolute favorite Van Gogh pieces. I always thought it would be cool to make a Starry Night piece but to do a rendition on it. So, for my art internship at Ringwood Public Library last semester, I had my middle schoolers approach this piece in a different way. I call this, Starry Night (with a twist!)

Students were asked to examine Van Gogh's Starry Night painting, and then create their own masterpieces. They did not have to recreate the original piece. Instead, they were allowed the freedom to replace elements of the picture with something completely different. For instance, they could get rid of the big tree on the left and make it into a whole new landscape. After practicing different line variations that are present in the piece (swirls, broken lines, etc), the students were to think about how to incorporate Van Gogh's line design into their Starry Night pictures. So, while the students could change the scene, they still had to include Van Gogh's line variations and 11 stars.


This is the worksheet they worked on prior to starting the project. We experimented with expressing various moods through pattern/color. They loved this.


Then, I provided students with a "movement" worksheet to practice line. They traced over an existing pattern and added to it. 


Then, they got started on their Van Gogh pieces in pastel. Needless to say, I was completely impressed by how well these kids were doing. Mind you, they're only 11!
This student consistently refused to use color. However, we were using oil pastels on black paper so he HAD to. He ended up pushing himself and doing really well! I love the illumination affect from this one.
Love the different lines developing in this one! ^

This was definitely a success. The students loved it and felt really proud of their own masterpieces!

Welcome to my page!!

Hello all! I am very excited to get my blog started and share my favorite lessons with all of you.


A little about me:
My name is Alexis and I am 22 years old.
I am finishing my student teaching at Old Bridge High School in NJ and pursuing a career in art education!
I have had a lot of experience working with kids (and I absolutely LOVE it). I have a large, crazy family with lots of little kids. Spending time with them is one of my favorite things to do. Not to mention we create some awesome holiday videos. That's basically me pretending to be a Hollywood director filming the next Oscar nominated film about an evil turkey attacking the children on Thanksgiving. Watch out for us on your screens in the next year...
For as long as I can remember I know I've wanted to be a teacher. I think I just truly enjoy the look on someone's face when I know I've helped them accomplish something. It makes me feel like I'm doing something good for someone.
I also love art. I've been drawing and painting since I was younger, so I decided to study Visual Arts in college. Art is the perfect avenue for expression and I love how meditative it can be. This is something I always try to communicate to students.
I may not have an actual teaching job yet but I have plenty of experience! I'm going to use this page to share some of my success stories and post lessons from my student teaching and past internship!
Hope you enjoy!!